Maintenance manual · Section 2 · scan pages 15-21
Tape Transport Maintenance
Tape transport maintenance includes procedures for adjusting supply and takeup reel brakes, adjusting supply reel hold-back tension, and adjusting capstan pinch roller pressure.
2-1 TRANSPORT ACCESS↑ TOP
To gain access to recorder transport proceed as follows:
- Remove power cord and place recorder in an upright position.
- Use metric allen wrench and remove top panel, two side panels, and rear cover by removing four screws per panel (16 screws total).
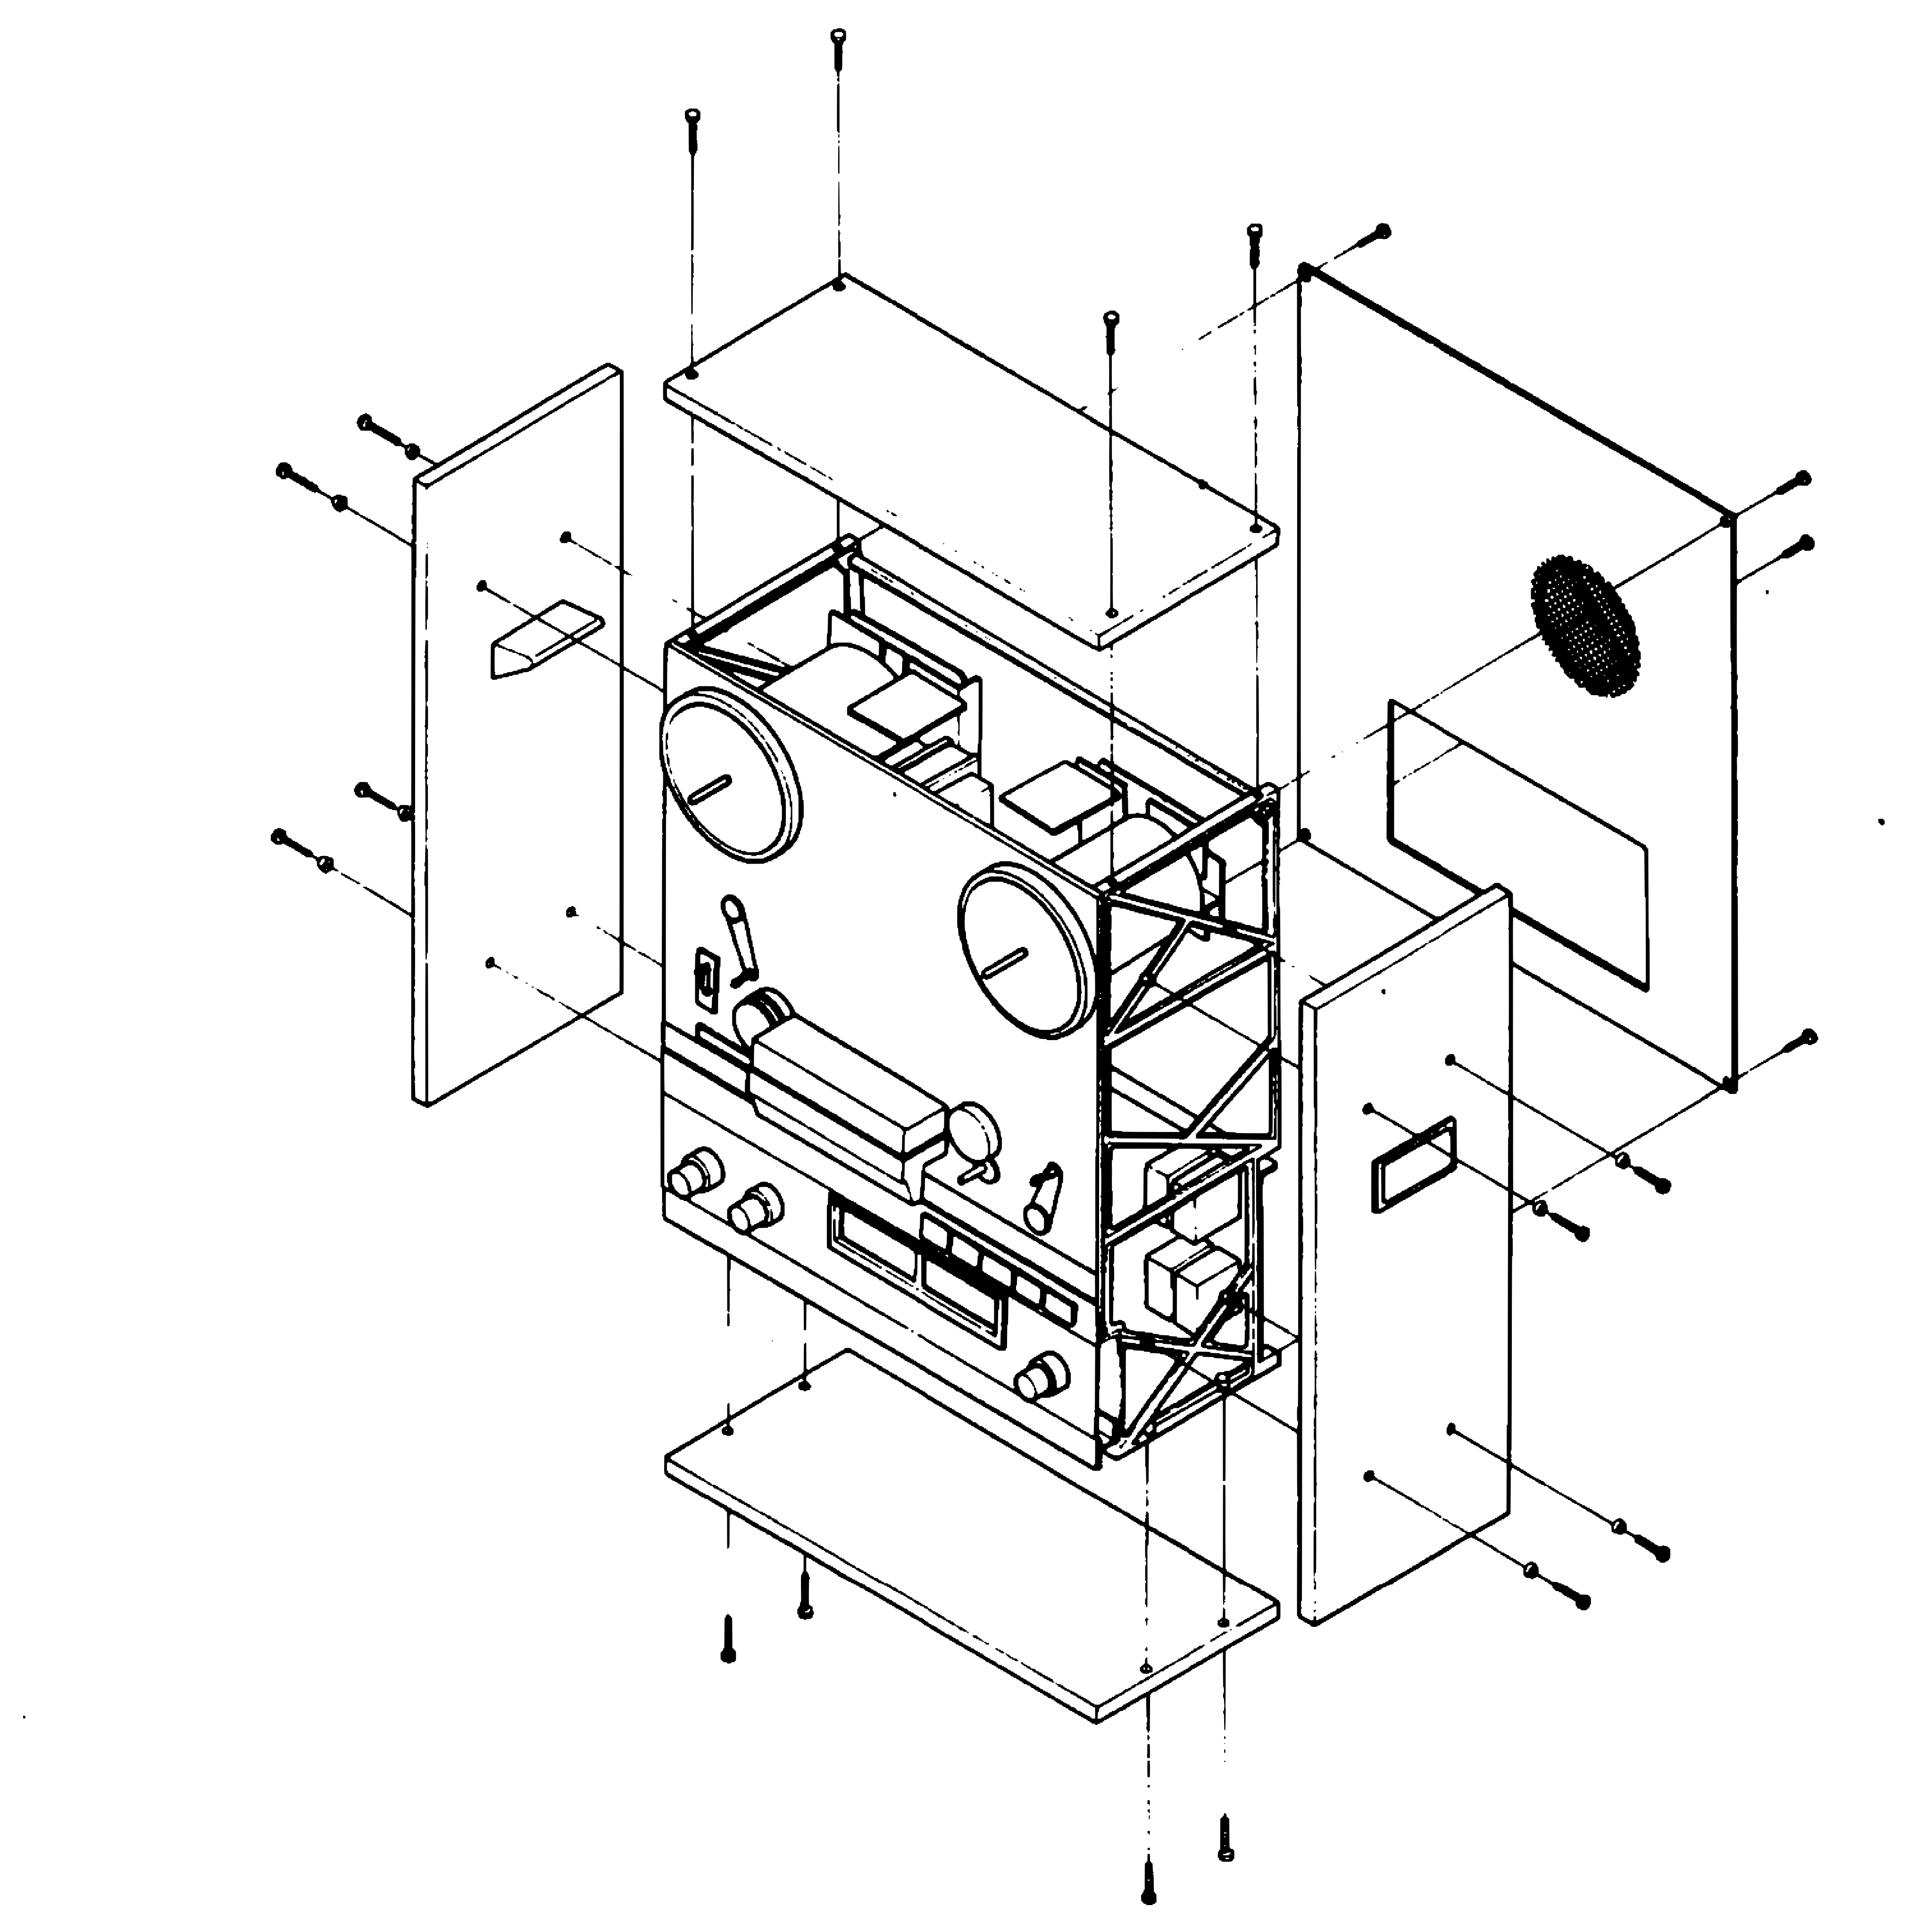 ⤢ zoomFig. 2-1 Transport Access · Redrawn as vector — zooms cleanly ·
2-2 BRAKE ADJUSTMENT↑ TOP
The brake system on each reel stops reel rotation when entering stop mode or when power is removed. The brakes are checked and adjusted with power removed. Since the brake force is different for each direction of rotation (brake differential), and there is a single adjustment, the force is checked and adjusted for the best compromise force in each direction.
In the following steps, an empty 10½ inch diameter NAB reel (4½ inch diameter hub) is used and a cord or twine is wrapped on the reel. A spring scale is attached to a small loop formed in the free end of the cord or twine.
If an 10½ inch diameter NAB reel (4½ inch diameter hub) is not available, a 7 inch diameter (2¼ inch diameter hub) may be used but all readings must be multiplied by a factor of 2. Proceed as follows: Refer to table 2-1 for the tension specifications on each Model.
- Place an empty 10½ inch diameter NAB reel on the supply reel turntable. Secure with a holddown knob.
- Wind a cord or twine a few turns counterclockwise on the hub. Tie a loop in the free end of the cord or twine.
- Insert the hook of a 0-16 ounce or 0-32 ounce spring scale through the loop and hold the spring scale upright as shown in Fig. 2-2.
- Pull on the scale slowly to make the reel rotate counterclockwise. While being sure the cord does not rub against either flange, note the scale reading. Reading should be "B" in Table 2-1.
- Wind the cord or twin in a clockwise direction on the supply reel.
- Repeat steps 3 and 4 to make the reel rotate clockwise. Reading should be "A" in Table 2-1.
- If the readings were low in both directions, remove the brake spring (shown in Fig. 2-3) from the existing anchor hole on the brake lever and install spring in the next hole located farther away from the brake solenoid.
- If the readings were high in both directions move the spring anchor point to a hole closer to the brake solenoid.
- If the brake spring was moved, repeat steps 2 through 6 to check results.
- Repeat the brake adjustment procedure on the takeup reel. Note that the high braking force is present when the takeup reel is rotated clockwise. The tension specifications are the same as for the supply reel.
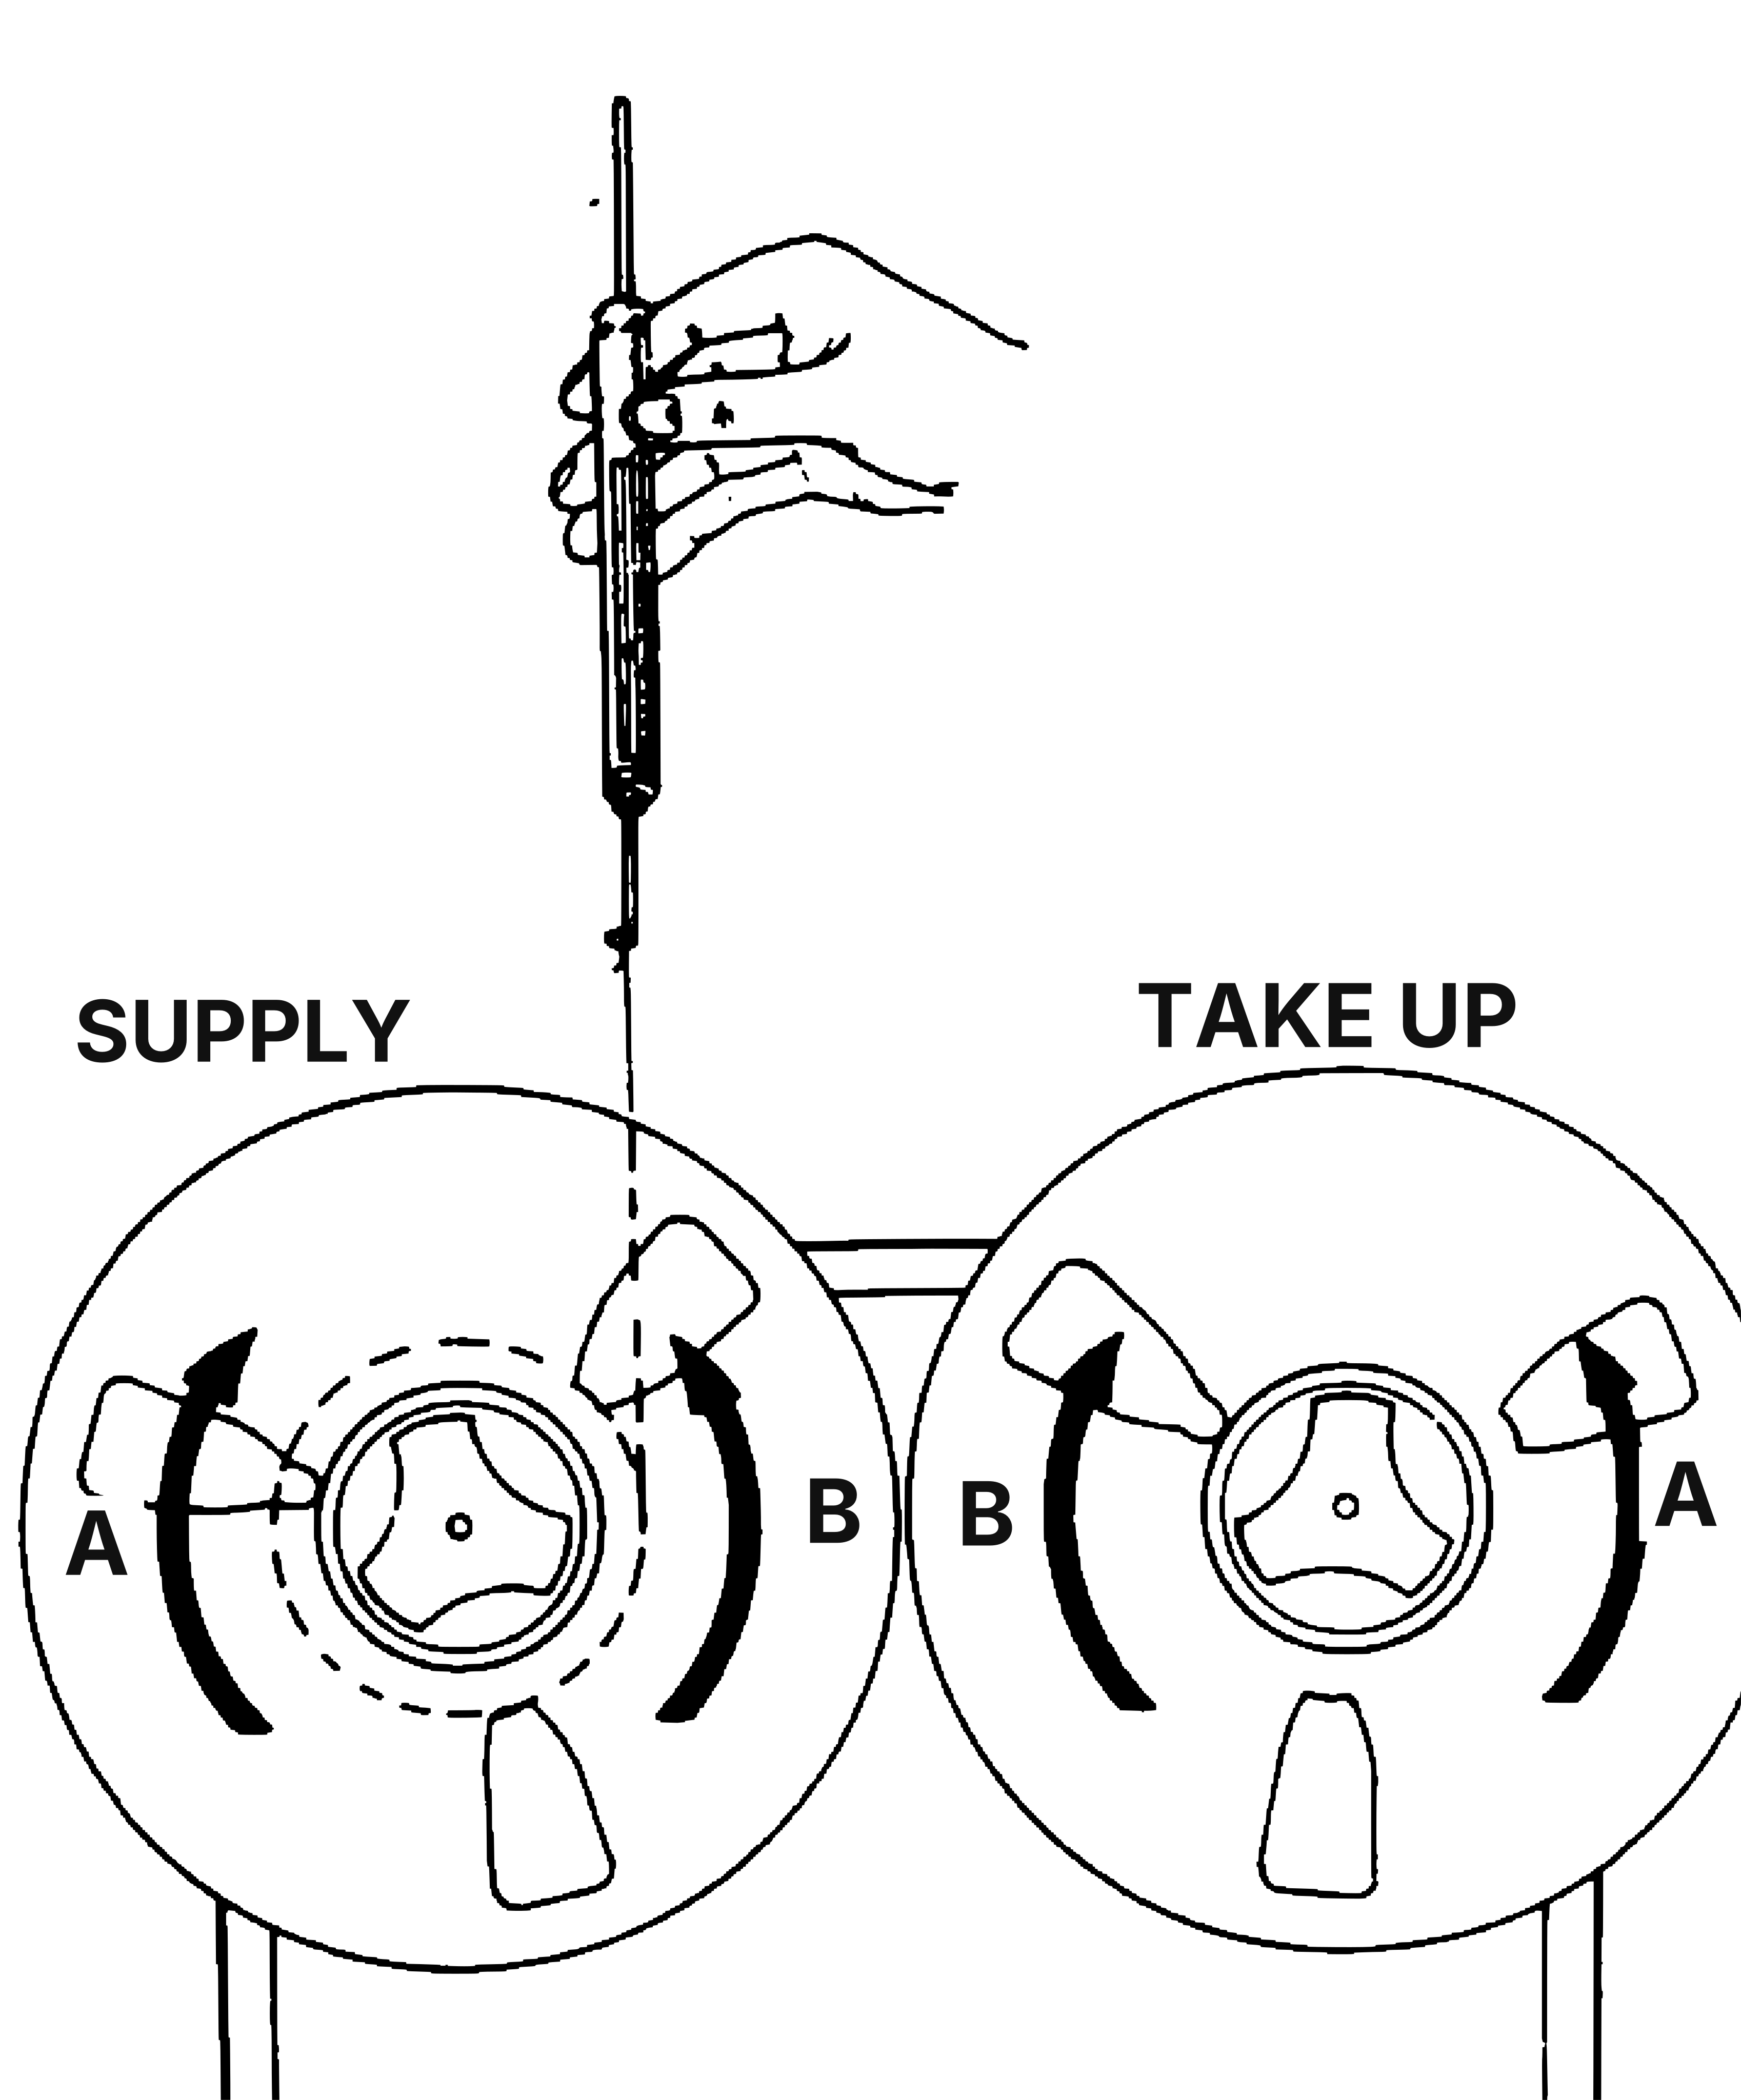 ⤢ zoomFig. 2-2 Measurement · Redrawn as vector — zooms cleanly ·
Table 2-1 Tension specifications
| A | 3.6~4.5oz (100~125g) |
| B | 7.9~9.7oz (225~275g) |
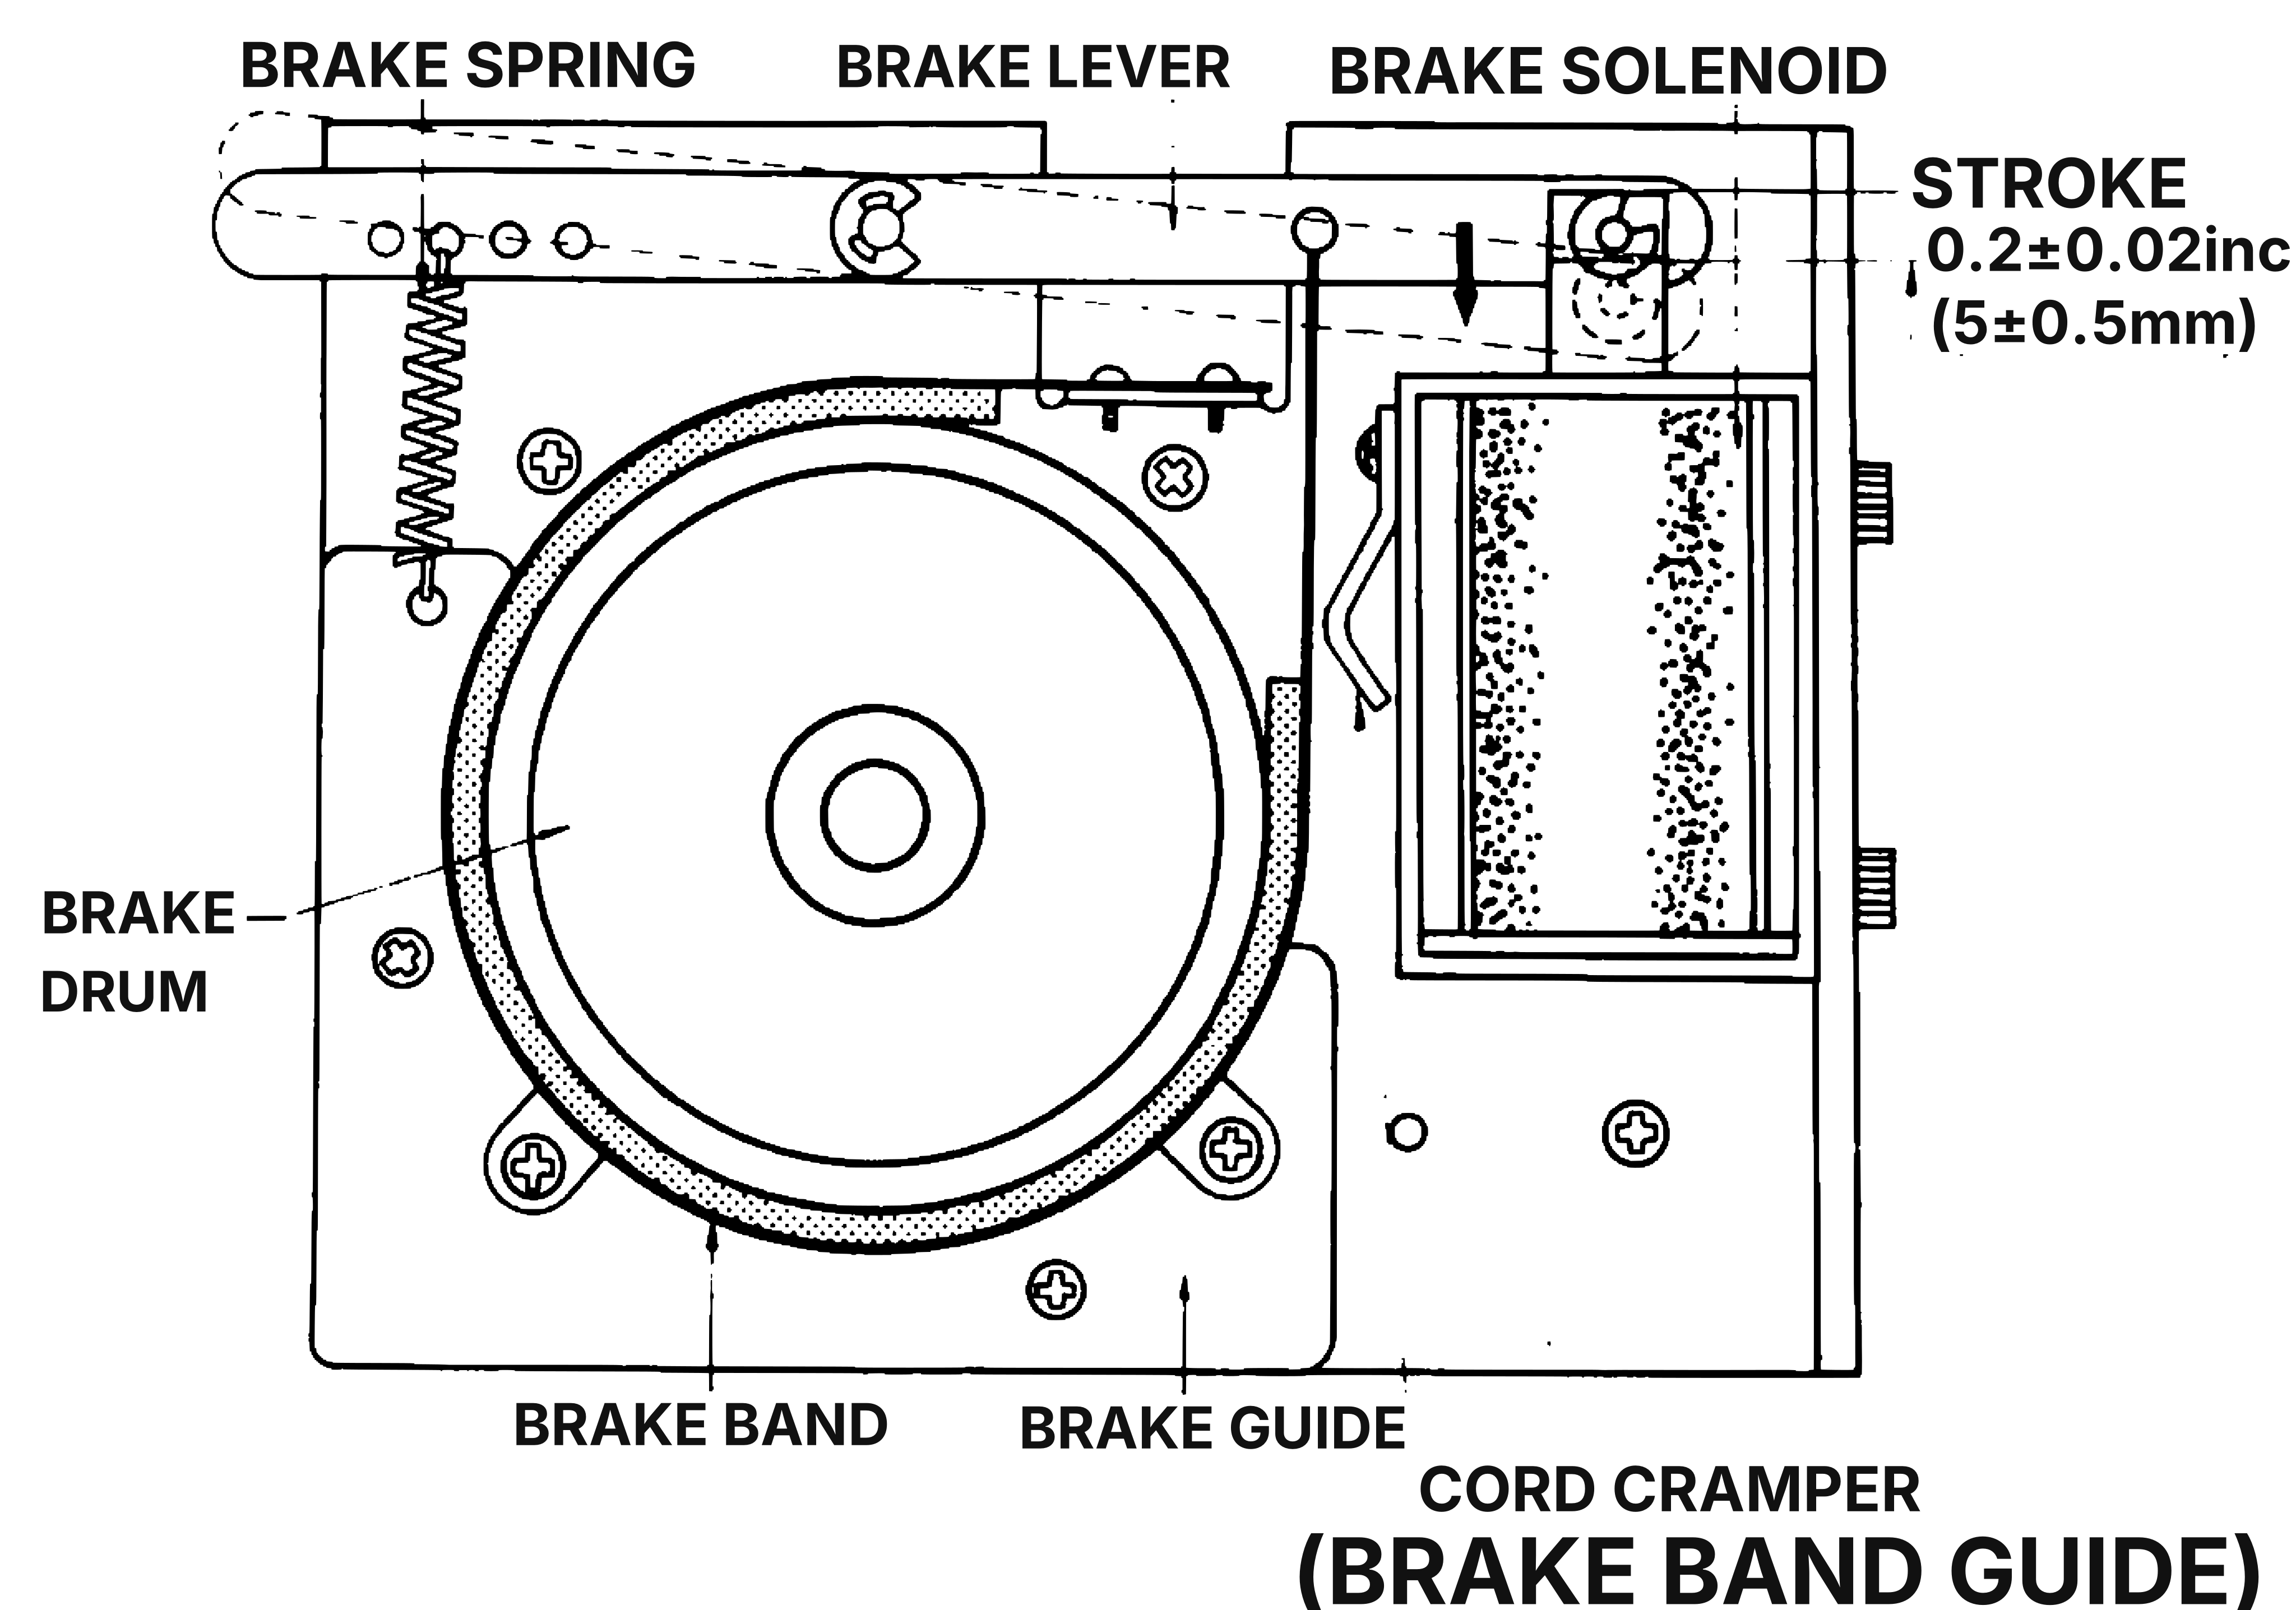 ⤢ zoomFig. 2-3 Adjusting Parts Location · Redrawn as vector — zooms cleanly ·
2-3 TAPE TENSION ADJUSTMENT↑ TOP
Tape tension is controlled by the amount of torque applied by the reel motors. Only the supply reel motor torque is adjustable. The tape tension is determined indirectly by measuring the supply motor holdback torque in play and fast forward modes. This tension is adjusted by positioning sliders on resistors located below the takeup motor (Fig. 2-4). When adjusting the sliders, loosen the contact screws just enough to slide the contact, then tighten the screw just enough to make good electrical contact.
WARNING
WHEN TRANSPORT POWER IS ON, LINE VOLTAGE IS PRESENT AT THE RESISTORS. TURN POWER OFF BEFORE MAKING AN ADJUSTMENT.
The supply reel tensions were adjusted at the factory with a local power line source. Since motor torque is affected by the source voltage, verify the source voltage is correct before making any adjustment.
In the following steps, an empty 10½ inch diameter NAB reel is used and a cord or twine is wrapped on the reel in the same direction as tape is pulled onto the reel. A spring scale is attached to a small loop formed in the free end of the cord or twine. If an 10½ diameter NAB reel (4½ inch diameter hub) is not available, a 7 inch diameter (2¼ inch diameter hub) may be used but all readings must be multiplied by a factor of 2. The spring scale is held stationary (Fig. 2-2) and with no slack in the cord. The scale indicates cord tension when in fast forward or play modes. Proceed as follows:
- Use adhesive tape to hold the takeup-tension-arm safety switch in an upright position so that the safety switch is not activated.
- Place an empty 10½ inch NAB reel on the supply turntable and secure reel with a holddown knob.
- Wind the cord or twine a few turns counterclockwise onto the reel hub. Fasten a spring scale to a loop formed on the free end of the cord or twine (Fig. 2-2).
- Apply power to the recorder.
- Press F.FWD pushbutton switch. The reading should be "C" in Table 2-2. If necessary adjust slider "C". (Moving slider towards front of transport increases tension.)
- Set REEL switch to Large "out" position.
- Hold the scale upright and press PLAY pushbutton switch. After an initial surge, the reading should be "A" in Table 2-2. If necessary adjust slider "A". (Moving slider towards front of transport increase tension.)
- Set REEL switch to Small "in" position.
- Press PLAY pushbutton. After an initial surge, the reading should be "B" in Table 2-2. If necessary adjust slider "B". (Moving slider towards front of transport increases tension.)
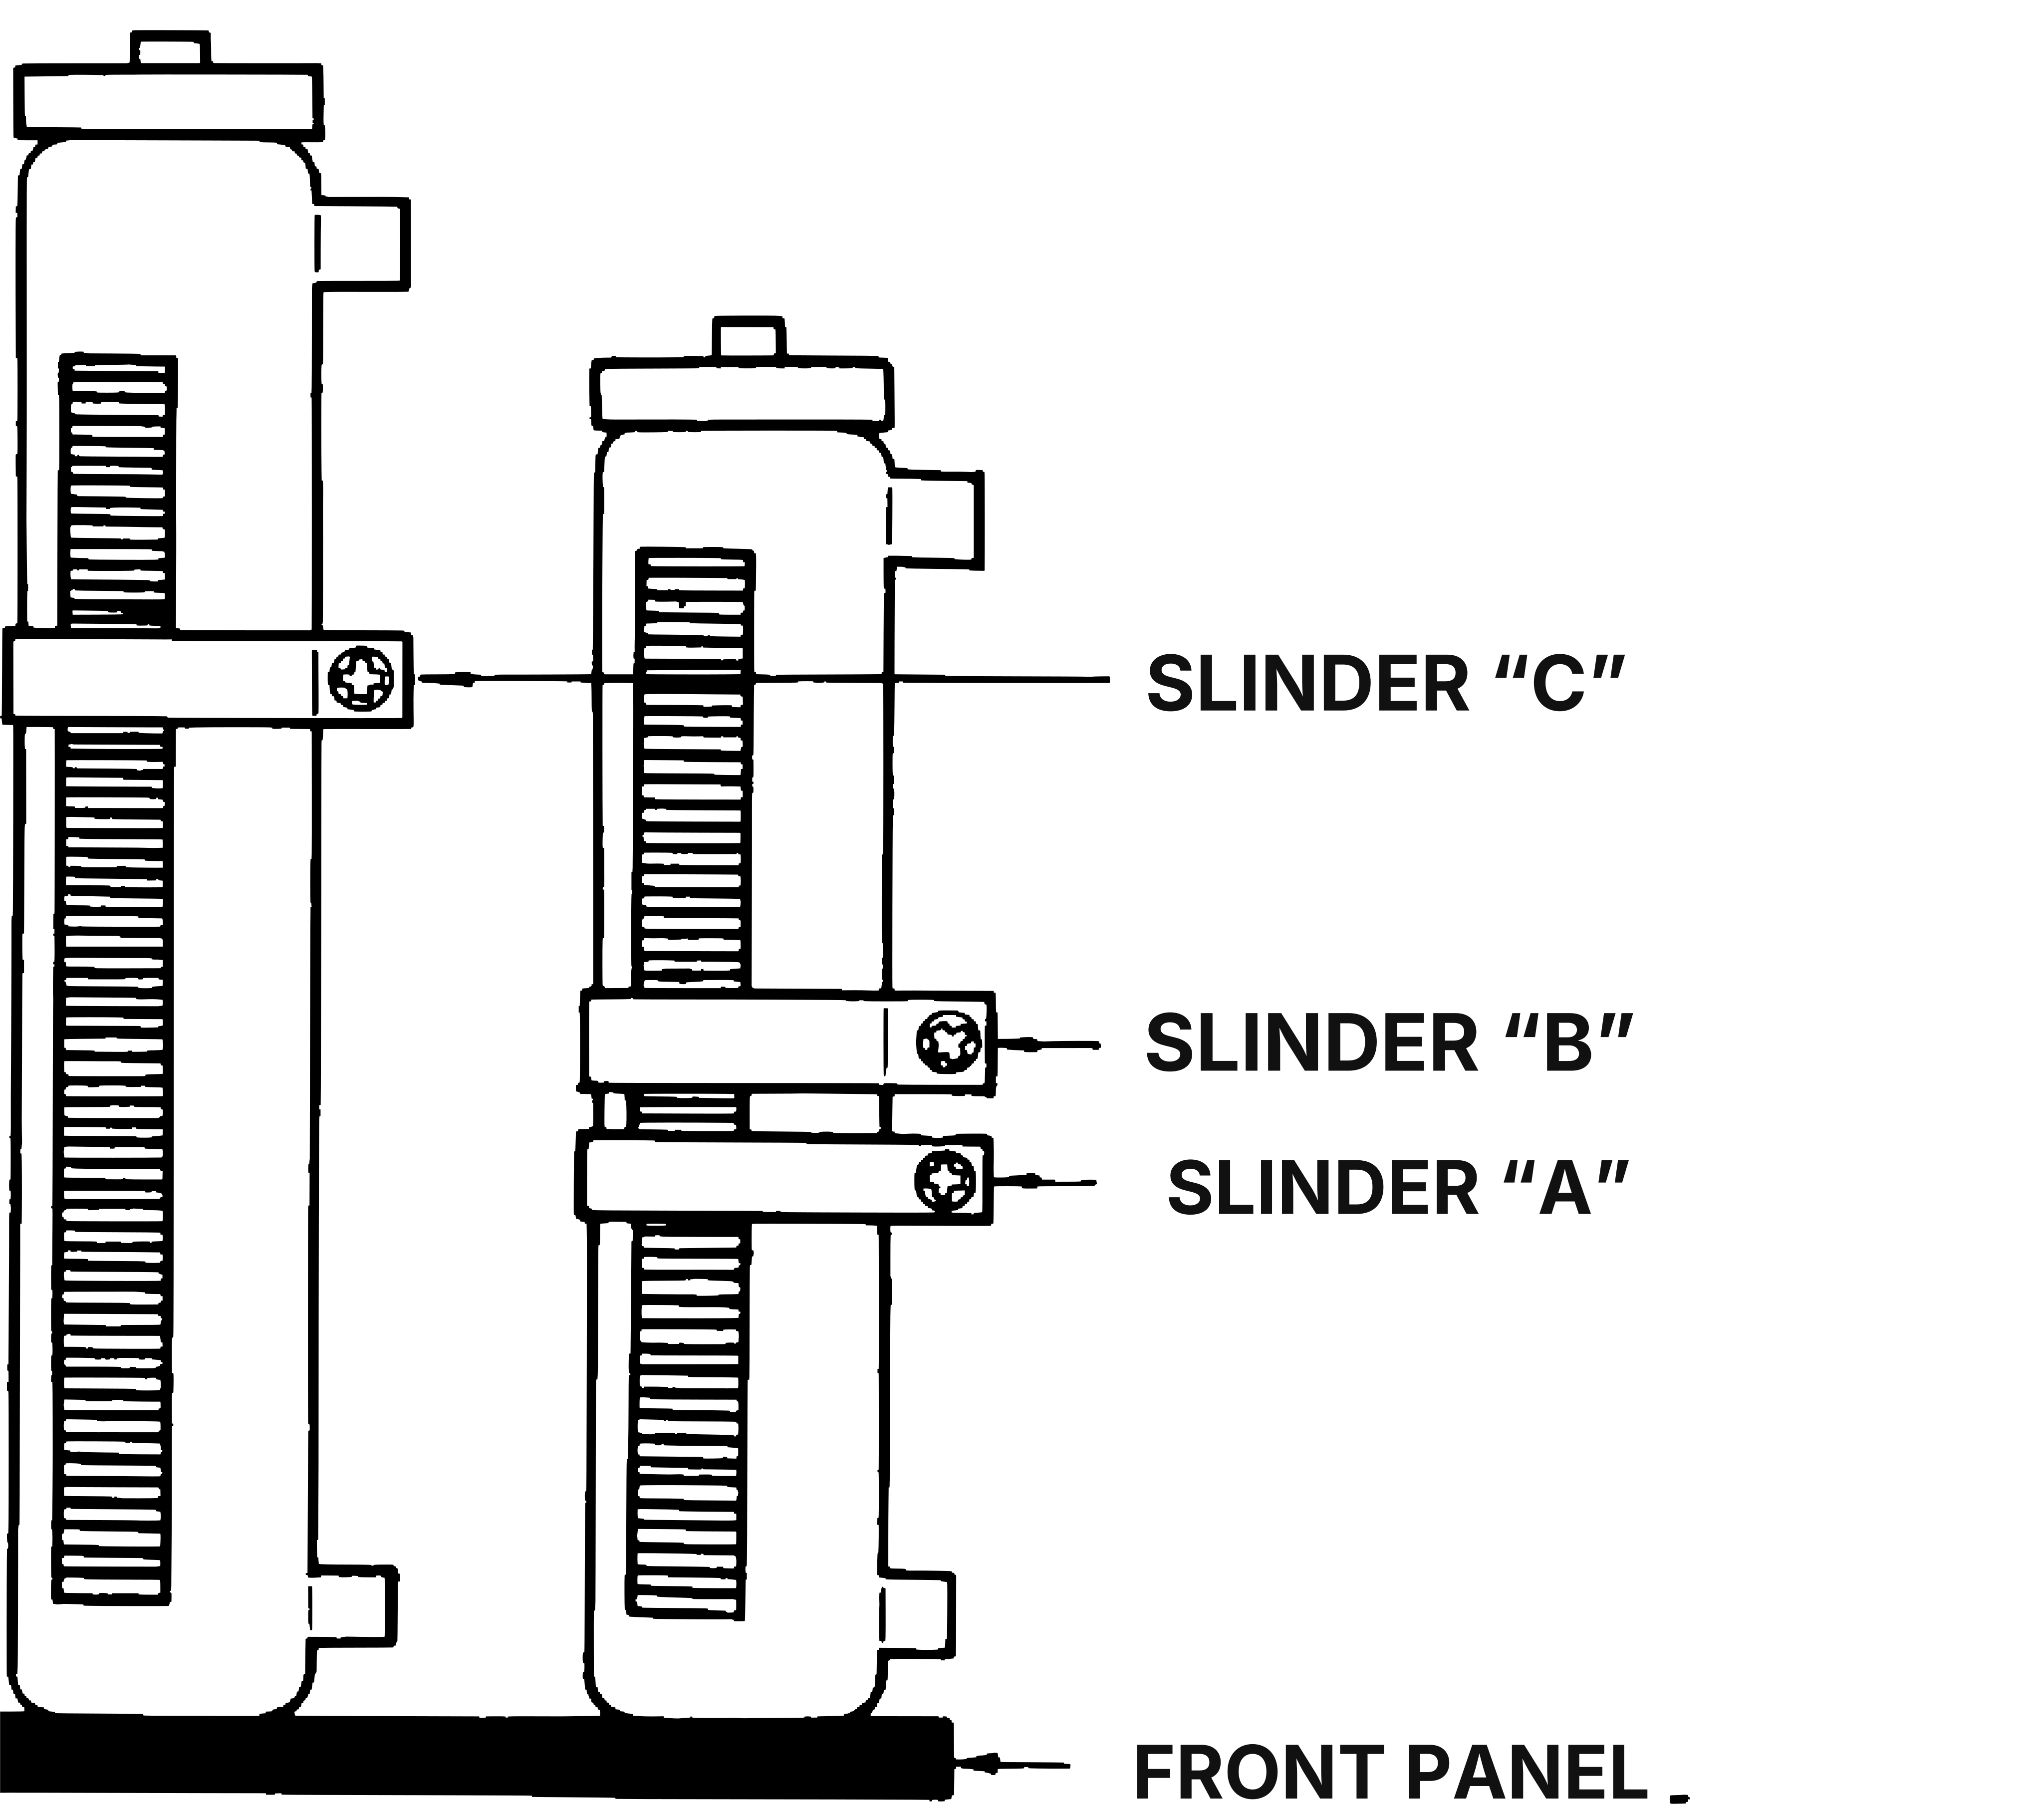 ⤢ zoomFig. 2-4 Tape Tension Adjustment Resistors · Redrawn as vector — zooms cleanly ·
Table 2-2 Tape Tension Specifications
| SLIDER | MODE | Specification |
|---|---|---|
| A | PLAY LARGE | 2.2~2.7 oz (63~77 gram) |
| B | PLAY SMALL | 1.4~1.8 oz (40~50 gram) |
| C | F.FWD. | 1.4~1.8 oz (40~50 gram) |
2-4 CAPSTAN PINCH ROLLER PRESSURE ADJUSTMENT↑ TOP
The capstan pinch roller pressure against the capstan is determined by the capstan solenoid spring. This force is adjusted by means of nut shown in Fig. 2-6. This force is adjusted by means of nut shown in Fig. 2-6. The nut is adjusted to obtain a force of 6.4~7.0 pounds. The resistance of the solenoid coil rises with temperature and causes the solenoid force to decrease. Therefore, do not adjust the pinch roller pressure until the recorder has been operated in play mode for at least 30 minutes prior to performing the following procedure.
- Use adhesive tape to hold the takeup-tension-arm safety switch in an upright position so that the safety switch is not activated.
- Tie a cord or twine together for form a continuous loop. Place one end of the loop around the capstan pinch roller shaft.
- Press the PLAY pushbutton. The pinch roller will move to contact the capstan and both will rotate.
- Hook a 0 to 10 pound spring scale to the other end of the cord and pull the cord taut straight to center of capstan as shown in Fig. 2-5. Do not let the cord contact the rotating pinch roller.
- Pull on the scale and note the scale reading when the pinch roller just loses contact with the capstan (the pinch roller stops rotating). The scale reading should be 6.4~7.0 pounds.
- If the proper scale reading was not obtained in step 5, loosen the locknut and adjust the pressure nut as required. (Turning the pressure nut towards the spring increases pinch roller pressure.) Tighten locknut.
- After adjustment is completed, check that the solenoid bottoms within the solenoid coil (pinch roller can easily be pushed away from the capstan). If the solenoid does not bottom, loosen locknut and turn pressure nut away from spring until solenoid bottoms. Recheck pressure adjustment and tighten locknut.
After the proceeding adjustments are completed, reinstall top panel, two side panels, and rear cover (16 screws total). For transport component replacement procedures, refer to Section 4 of this manual.
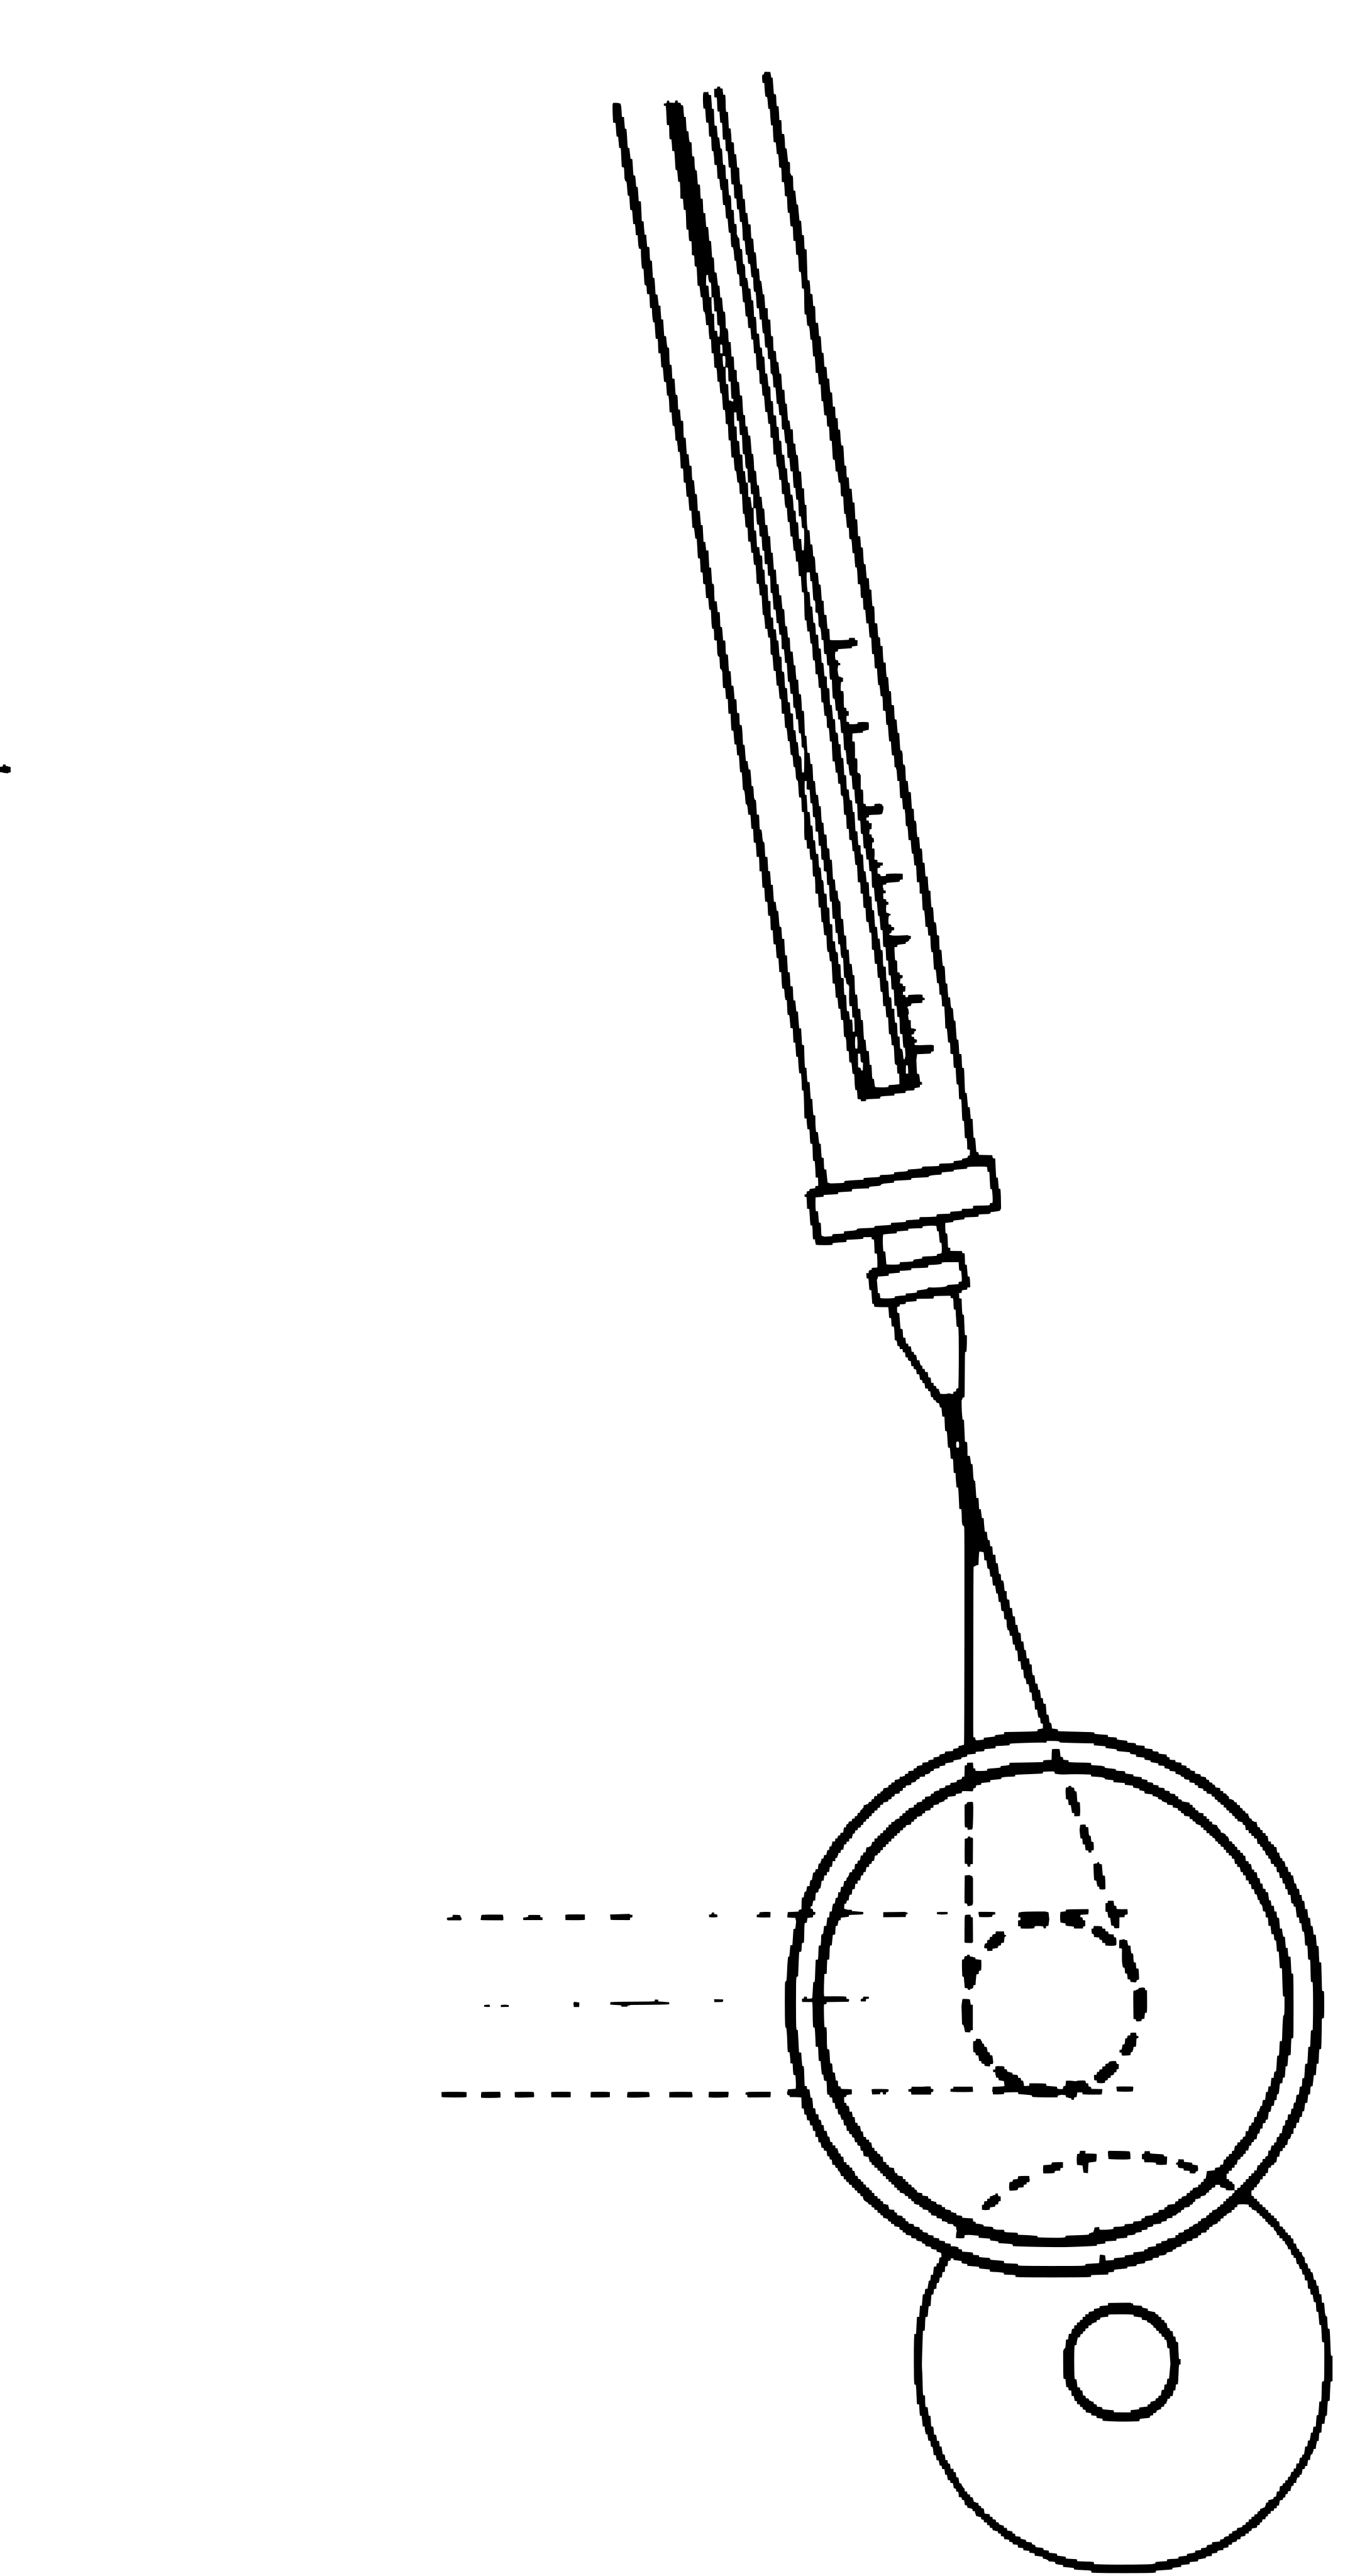 ⤢ zoomFig. 2-5 Measurement · Redrawn as vector — zooms cleanly ·
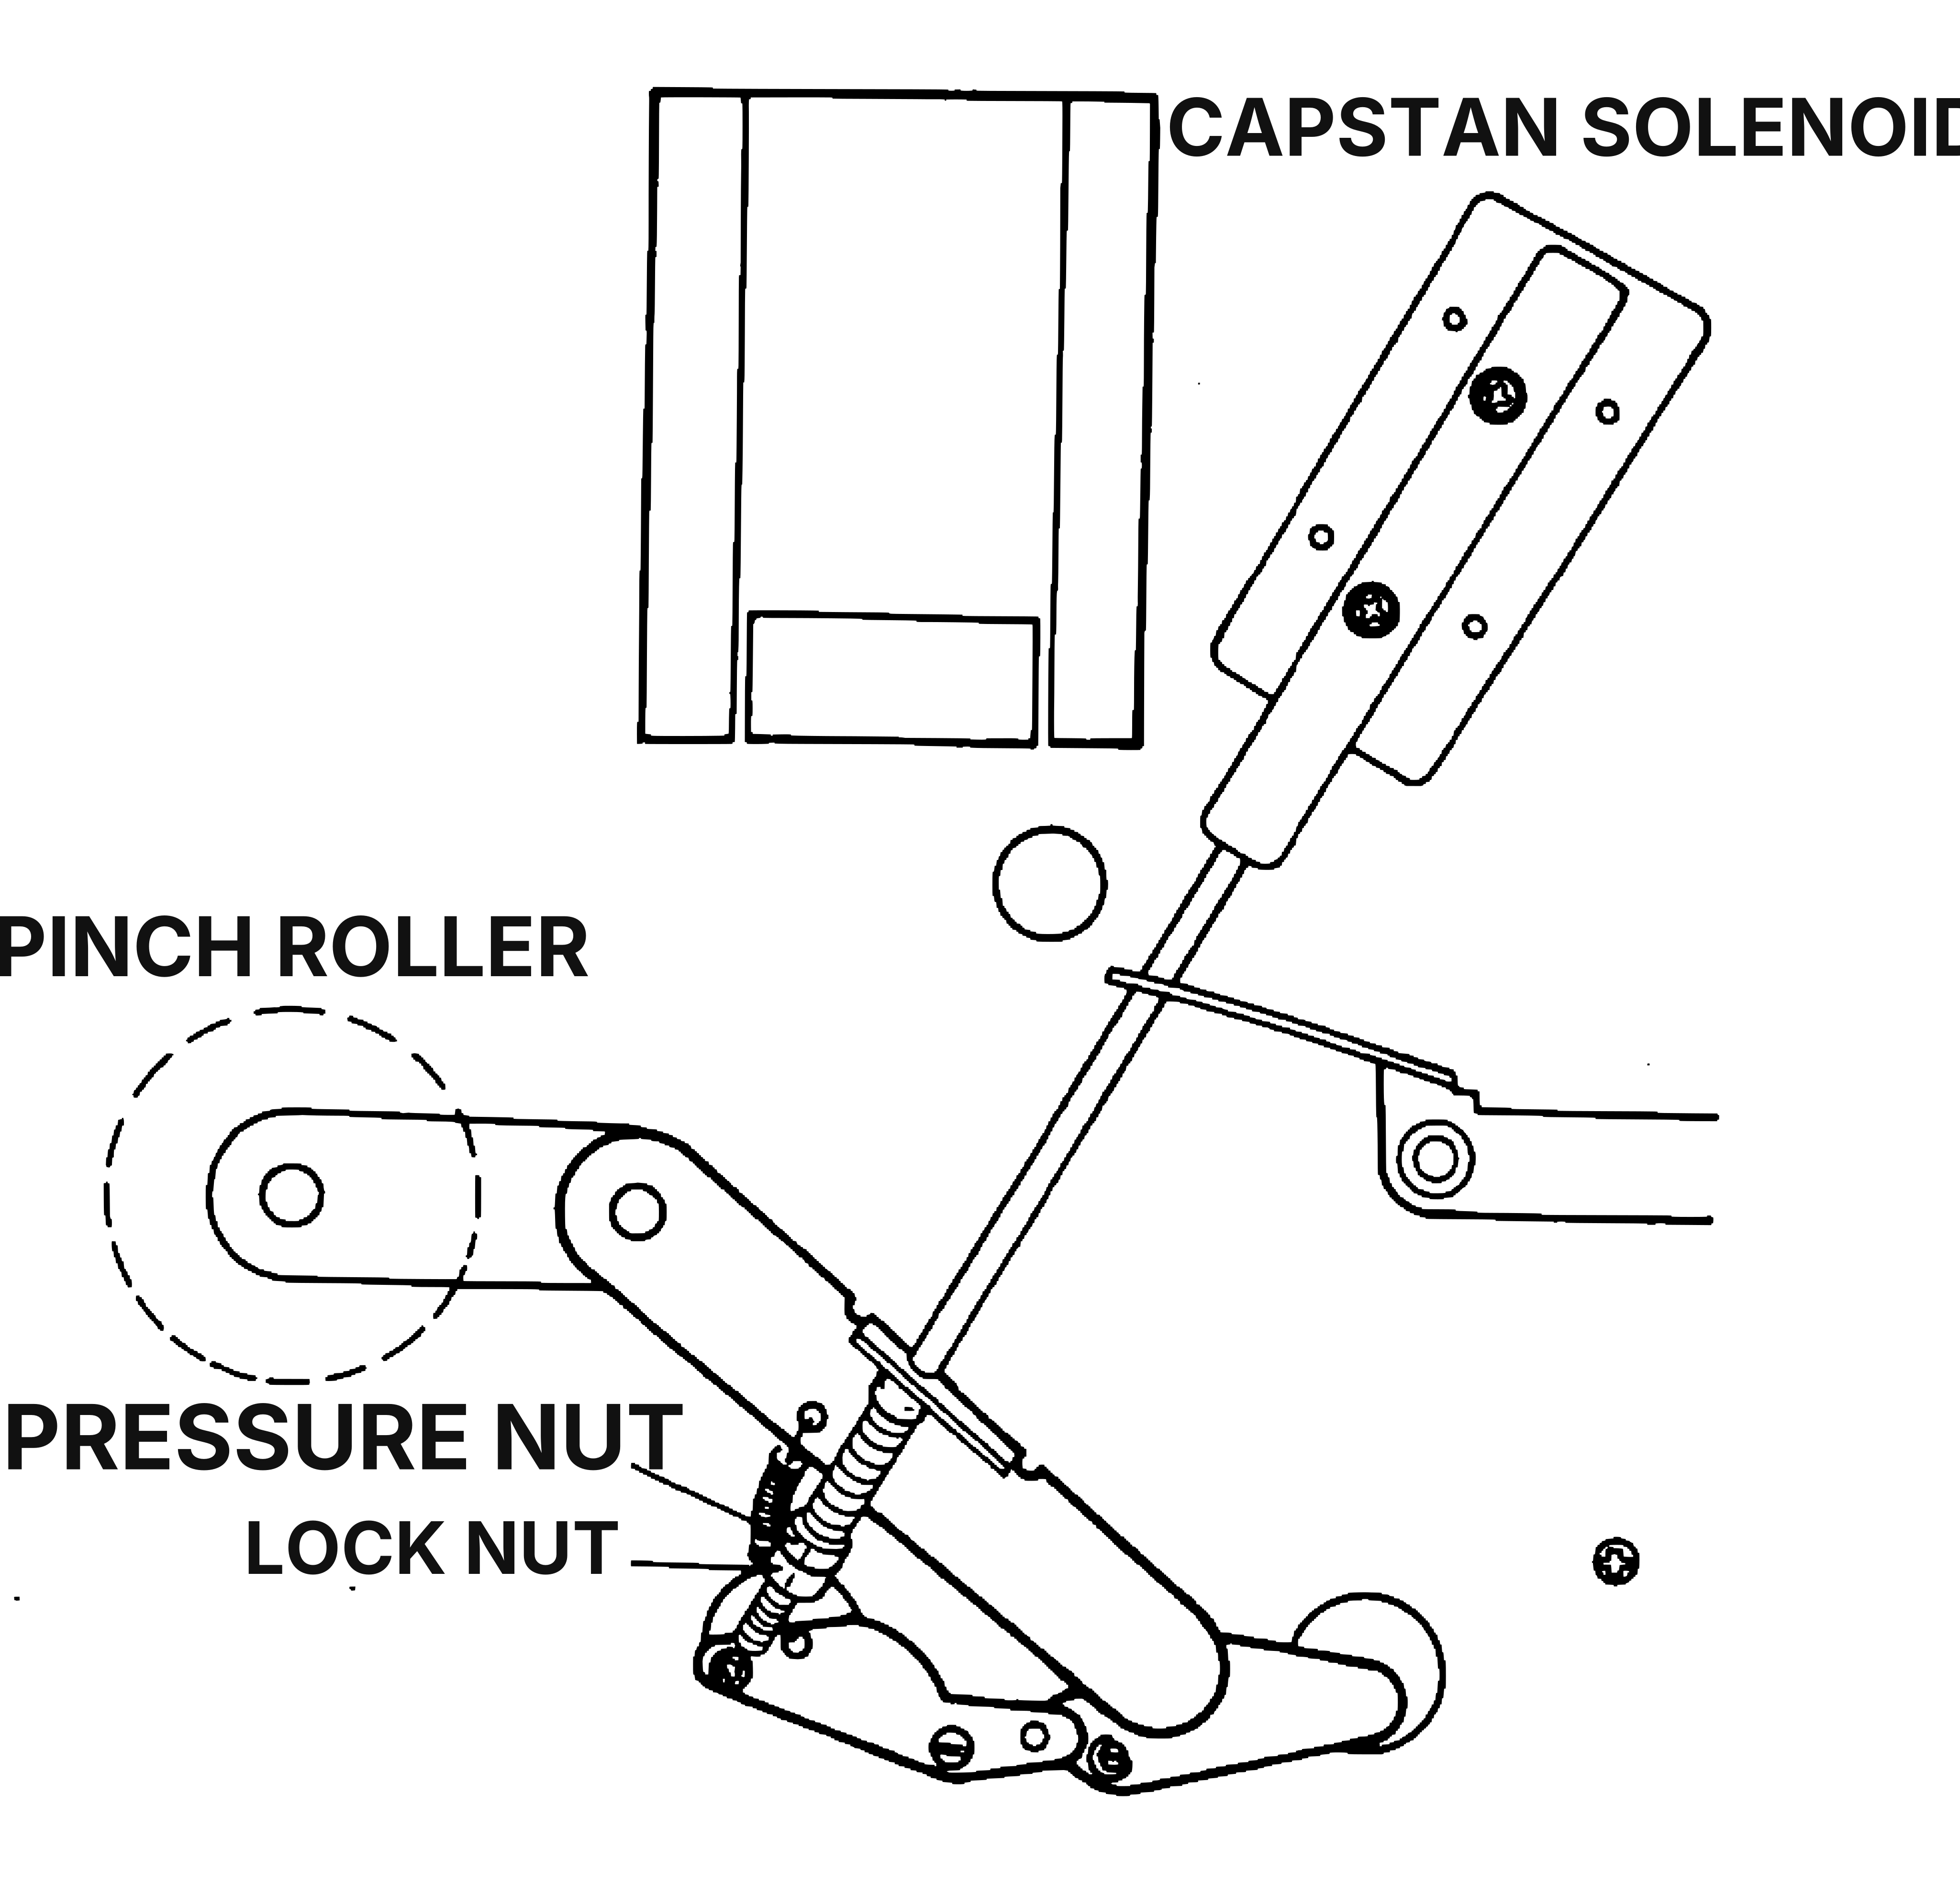 ⤢ zoomFig. 2-6 Adjusting Parts Location · Redrawn as vector — zooms cleanly ·
2-5 CAPSTAN SPEED ADJUSTMENT (D Type Only)↑ TOP
Capstan speed can be adjusted by speed control on servo control printed circuit board.
This adjustment follows tape speed measurement in Section 3 and adjust the speed control as shown in Fig. 2-7 as necessary.
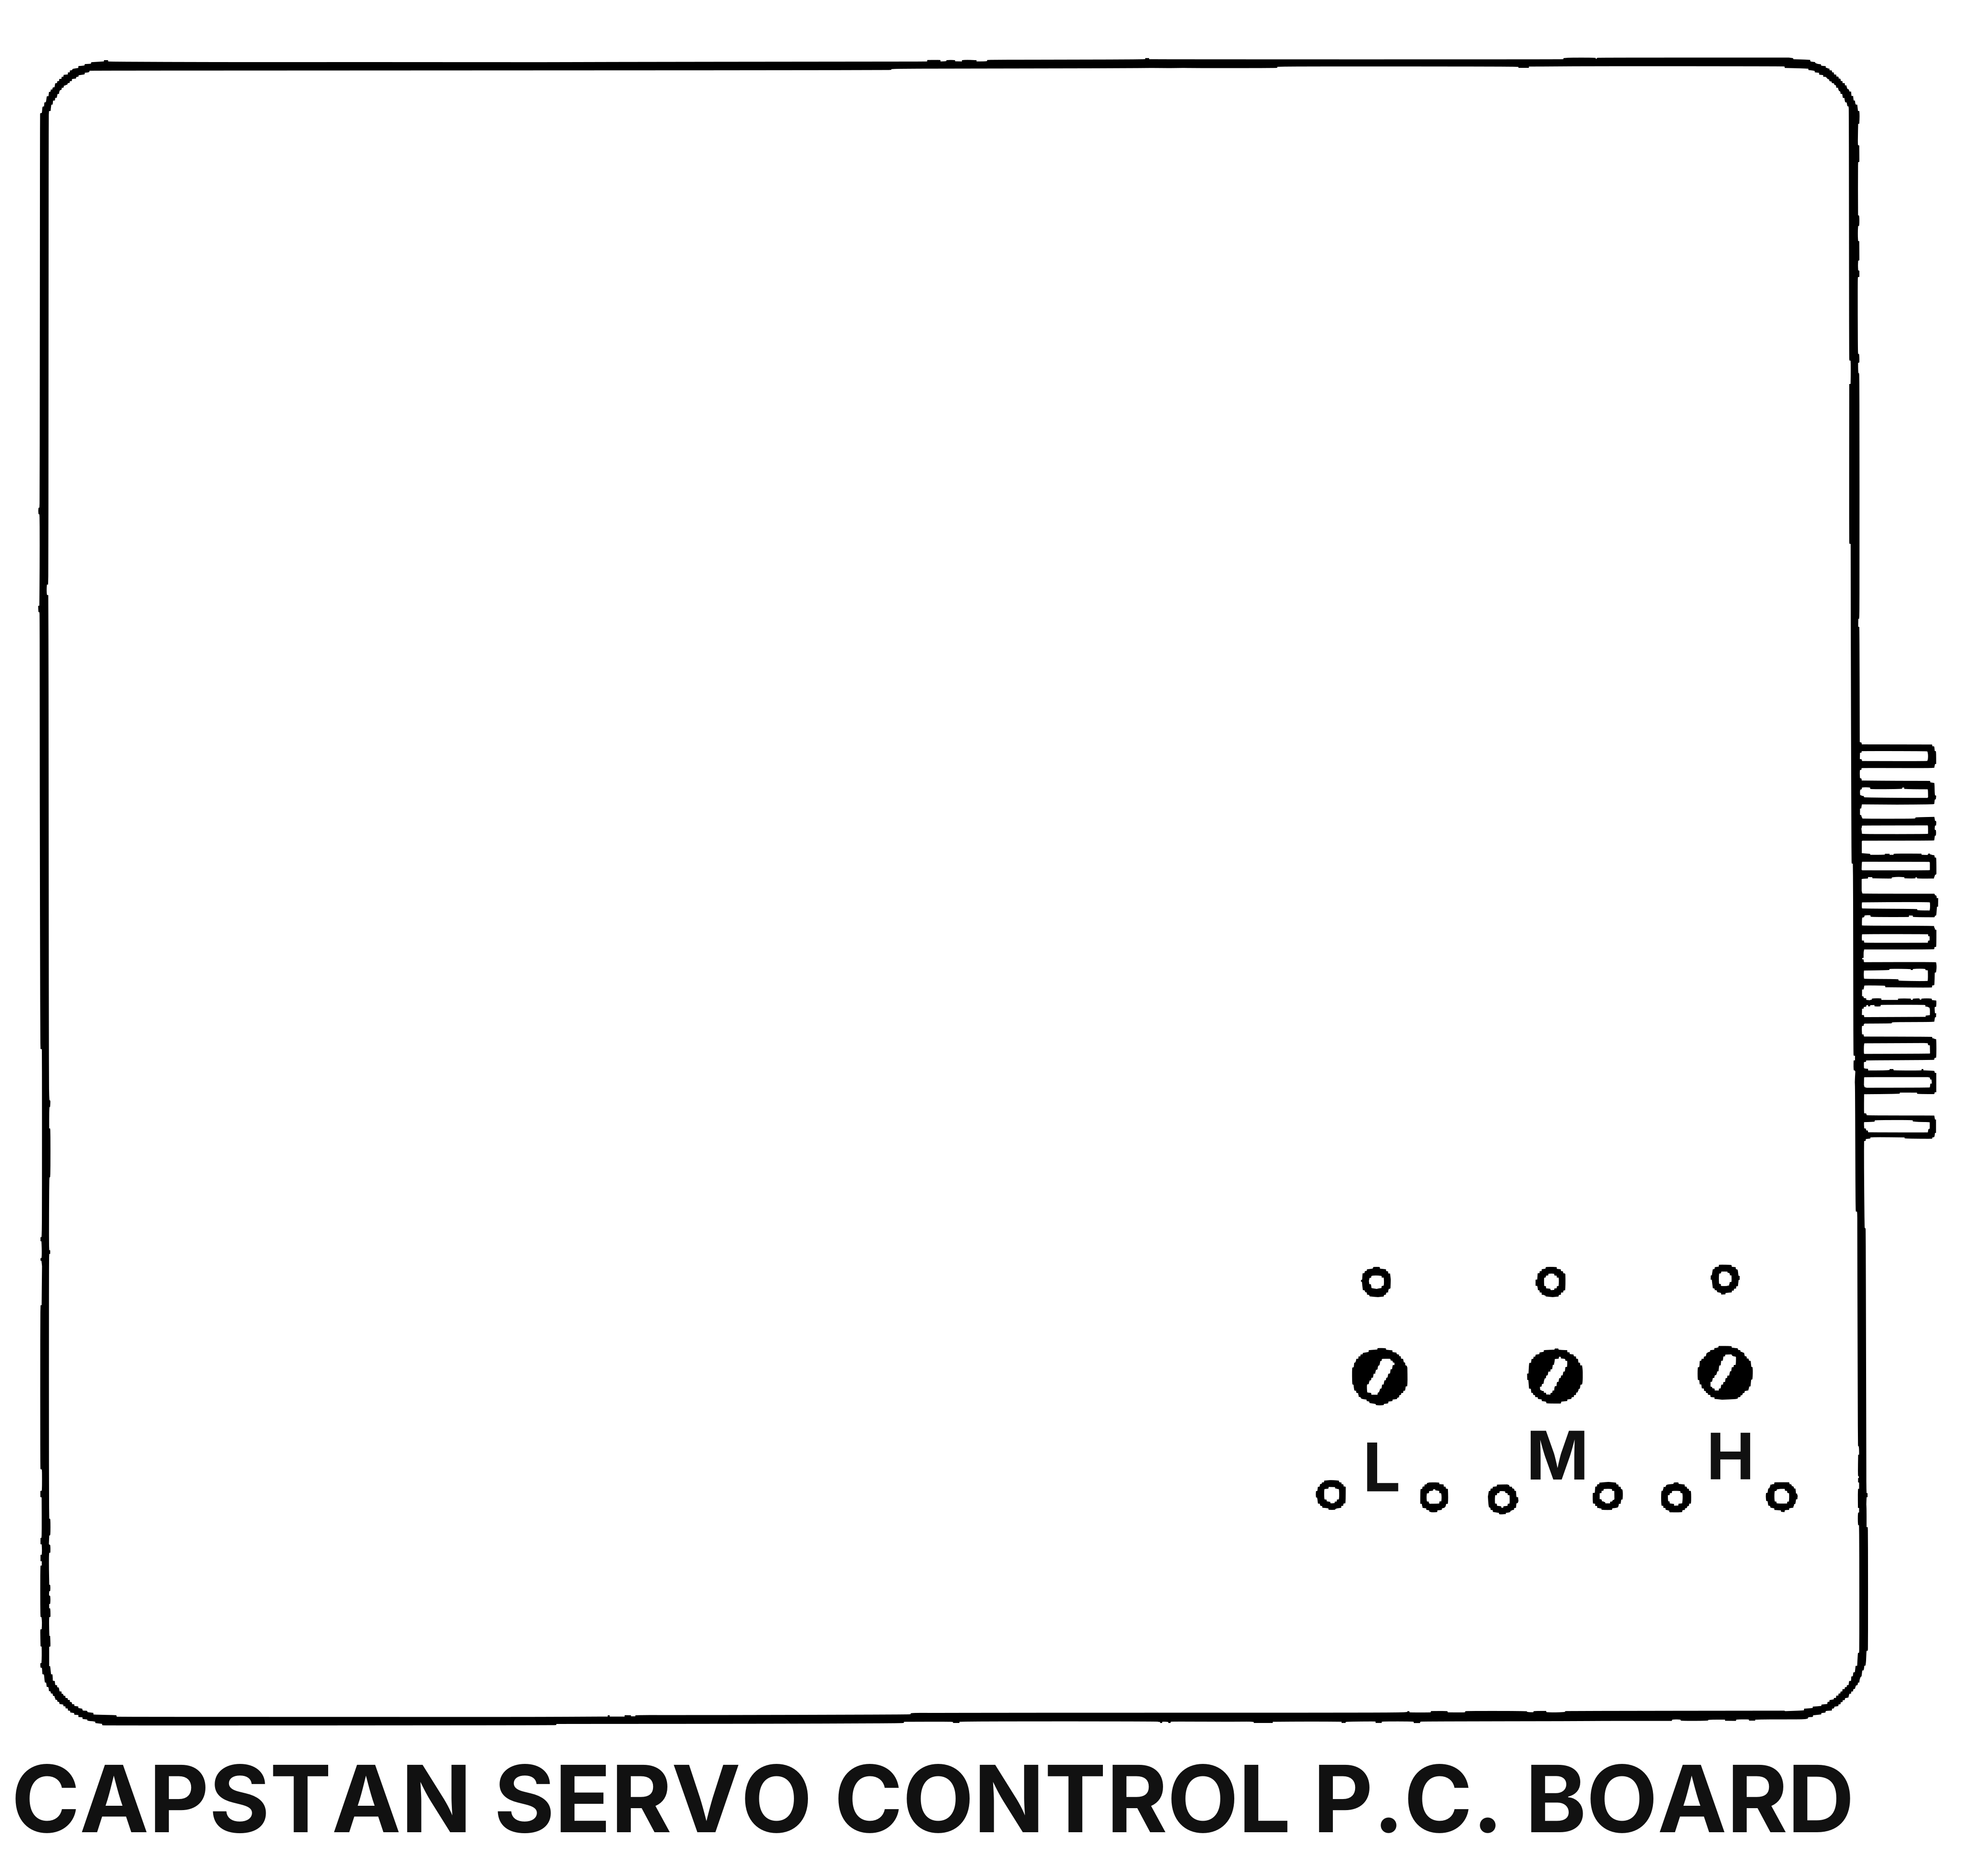 ⤢ zoomFig. 2-7 Adjusting Parts Location · Redrawn as vector — zooms cleanly ·